Peacock for Visual Studio Code
Overview
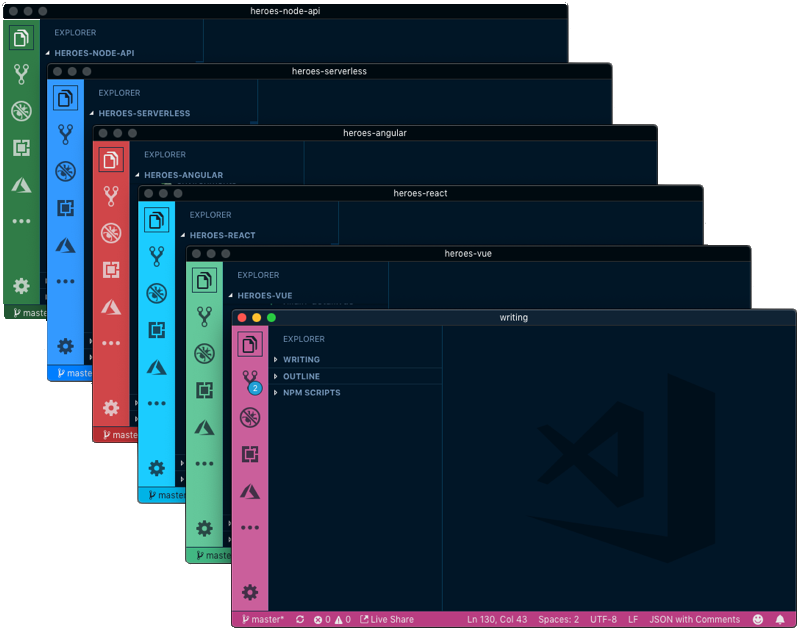
Subtly change the color of your Visual Studio Code workspace. Ideal when you have multiple VS Code instances, use VS Live Share, or use VS Code's Remote features, and you want to quickly identify your editor.
Peacock docs are hosted on Azure -> Get a Free Azure Trial
Install
- Open Extensions sideBar panel in Visual Studio Code via the menu item
View → Extensions - Search for Peacock
- Click Install
- Click Reload, if required
You can also install Peacock from the marketplace here
Quick Usage
Let's see Peacock in action!
- Create/Open a VSCode Workspace (Peacock only works in a Workspace)
- Press
F1to open the command palette - Type
Peacock - Choose
Peacock: Change to a favorite color - Choose one of the pre-defined colors and see how it changes your editor
Now enjoy exploring the rest of the features explained in the docs, here!
Features
Commands can be found in the command palette. Look for commands beginning with "Peacock:"
- Change the color of Affected Elements (see
peacock.affect*in the Settings section) to- user defined color
- a random color
- Select a user-defined color from your Favorite Colors
- Save a user-defined color with the Save Favorite Color
- Adjust the coloring of affected elements by making them slightly darker or lighter to provide a subtle visual contrast between them
- Saves colors to your workspace in the
.vscode/settings.jsonfile - Integrates with Live Share.
- Integrates with VS Code Remote.
Settings
| Property | Description |
|---|---|
| peacock.affectActivityBar | Specifies whether Peacock should affect the activity bar |
| peacock.affectStatusBar | Specifies whether Peacock should affect the status bar |
| peacock.affectDebuggingStatusBar | Specifies whether Peacock should affect the status bar while debugging. Defaults to false. |
| peacock.affectTitleBar | Specifies whether Peacock should affect the title bar (see title bar coloring) |
| peacock.affectEditorGroupBorder | Specifies whether Peacock should affect the editorGroup border. Defaults to false. |
| peacock.affectPanelBorder | Specifies whether Peacock should affect the panel border. Defaults to false. |
| peacock.affectSideBarBorder | Specifies whether Peacock should affect the sideBar border. Defaults to false. |
| peacock.affectSashHover | Specifies whether Peacock should affect the sash border. Defaults to true. |
| peacock.affectStatusAndTitleBorders | Specifies whether Peacock should affect the status or title borders. Defaults to false. |
| peacock.affectTabActiveBorder | Specifies whether Peacock should affect the active tab's border. Defaults to false |
| peacock.elementAdjustments | fine tune coloring of affected elements |
| peacock.favoriteColors | array of objects for color names and hex values |
| peacock.keepForegroundColor | Specifies whether Peacock should change affect colors |
| peacock.surpriseMeOnStartup | Specifies whether Peacock apply a random color on startup |
| peacock.darkForeground | override for the dark foreground |
| peacock.lightForeground | override for the light foreground |
| peacock.darkenLightenPercentage | the percentage to darken or lighten the color |
| peacock.surpriseMeFromFavoritesOnly | Specifies whether Peacock should choose a random color from the favorites list or a purely random color |
| peacock.showColorInStatusBar | Show the Peacock color in the status bar |
| peacock.remoteColor | The Peacock color that will be applied to remote workspaces |
| peacock.color | The Peacock color that will be applied to workspaces |
| peacock.vslsShareColor | Peacock color for Live Share Color when acting as a Guest |
| peacock.vslsJoinColor | Peacock color for Live Share color when acting as the Host |
| peacock.squigglyBeGone | Easter Egg feature for FUN. Hides all error, warning, and info underlines. This setting has NO effect on your code. |
Favorite Colors
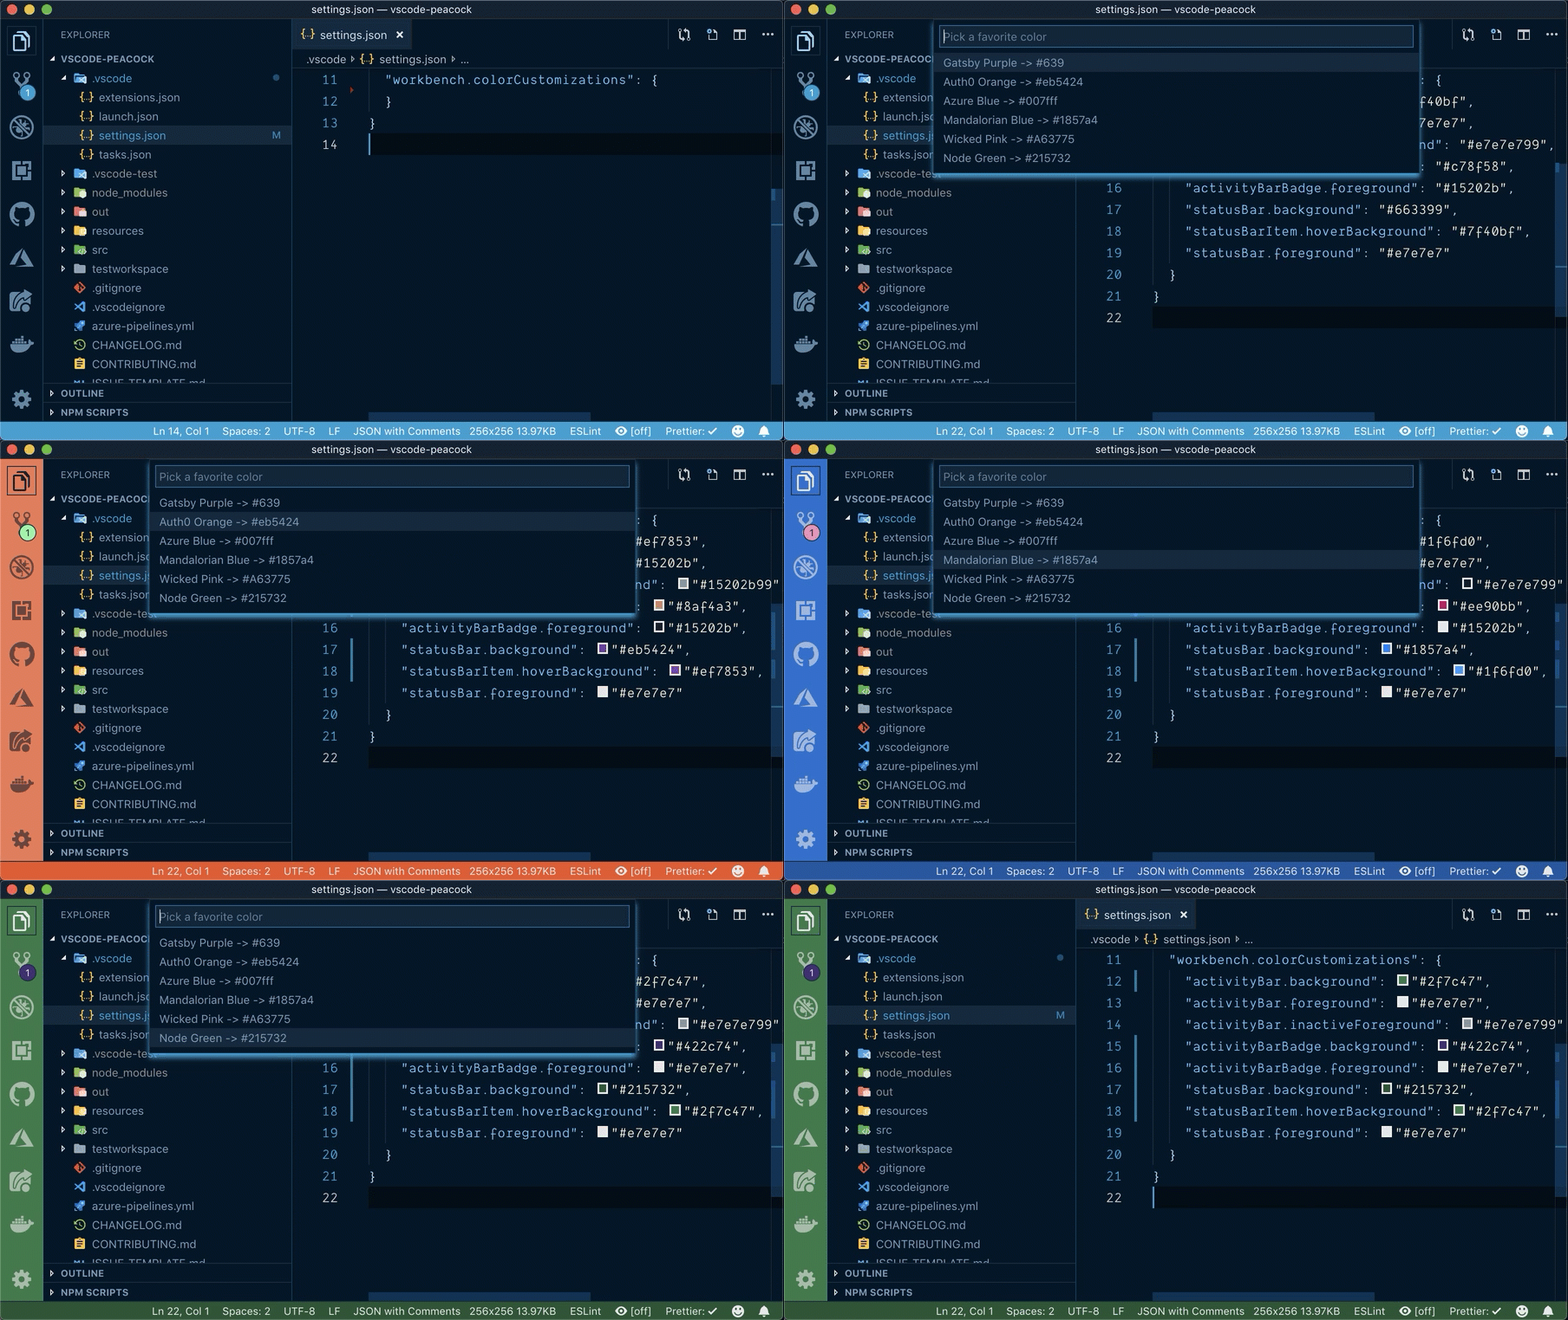
After setting 1 or more colors (hex or named) in the user setting for peacock.favoriteColors, you can select Peacock: Change to a Favorite Color and you will be prompted with the list from peacock.favoriteColors from user settings.
Gatsby Purple -> #123456
Auth0 Orange -> #eb5424
Azure Blue -> #007fff
Favorite colors require a user-defined name (name) and a value ( value ), as shown in the example below.
  "peacock.favoriteColors": [
    { "name": "Gatsby Purple", "value": "#639" },
    { "name": "Auth0 Orange", "value": "#eb5424" },
    { "name": "Azure Blue", "value": "#007fff" }
  ]
You can find brand color hex codes from https://brandcolors.net
Preview Your Favorite
When opening the Favorites command in the command palette, Peacock now previews (applies) the color as you cycle through them. If you cancel (press ESC), your colors revert to what you had prior to trying the Favorites command
Save Favorite Color
When you apply a color you enjoy, you can go to the workspace settings.json and copy the color's hex code, then create your own favorite color in your user settings.json. This involves a few manual steps and arguably is not obvious at first.
The Peacock: Save Current Color as Favorite Color feature allows you to save the currently set color as a favorite color, and prompts you to name it.
Affected Elements
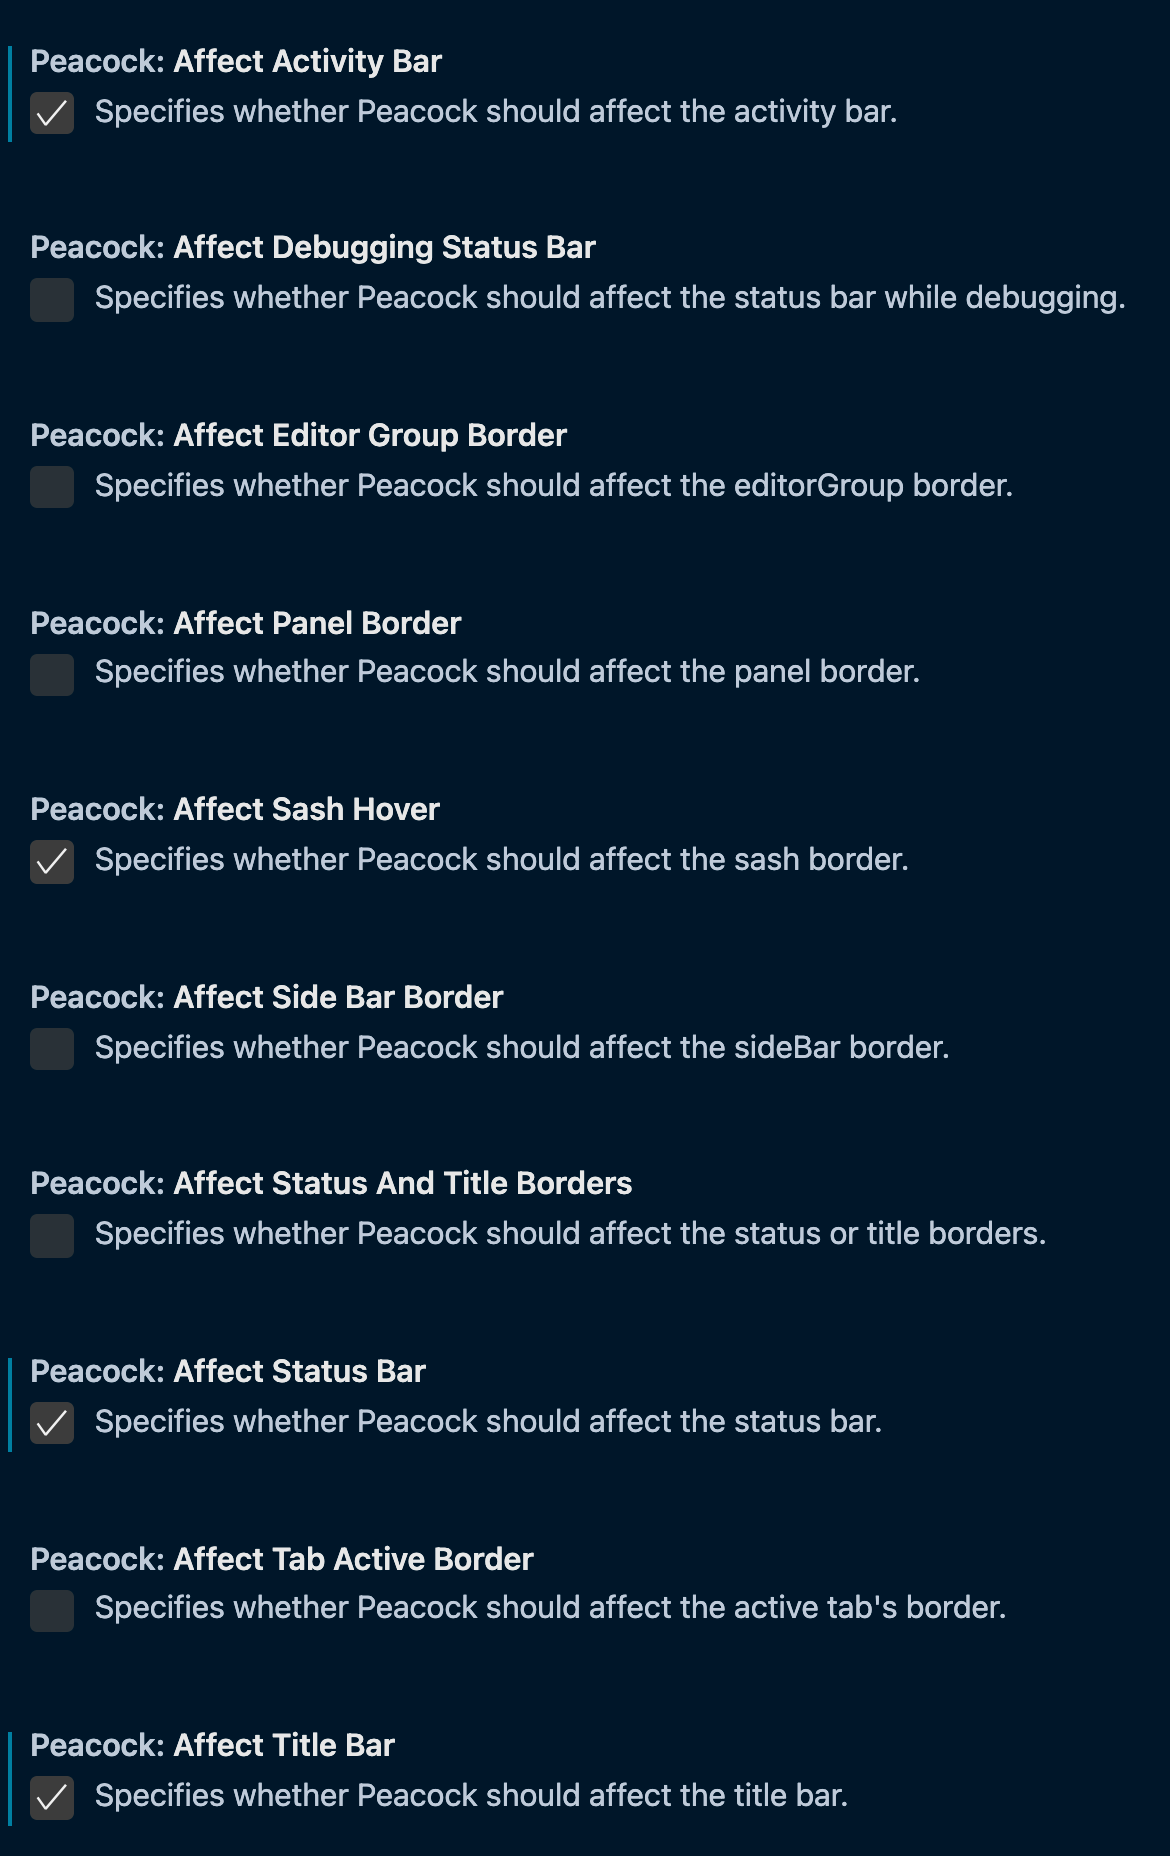
You can tell peacock which parts of VS Code will be affected by when you select a color. You can do this by checking the appropriate setting that applies to the elements you want to be colored. These include examples such as affectEditorGroupBorder, affectPanelBorder, affectSideBarBorder, affectSashHover.
Element Adjustments
You can fine tune the coloring of affected elements by making them slightly darker or lighter to provide a subtle visual contrast between them. Options for adjusting elements are:
"darken": reduces the value of the selected color to make it slightly darker"lighten": increases the value of the selected color to make it slightly lighter"none": no adjustment will be made to the selected color
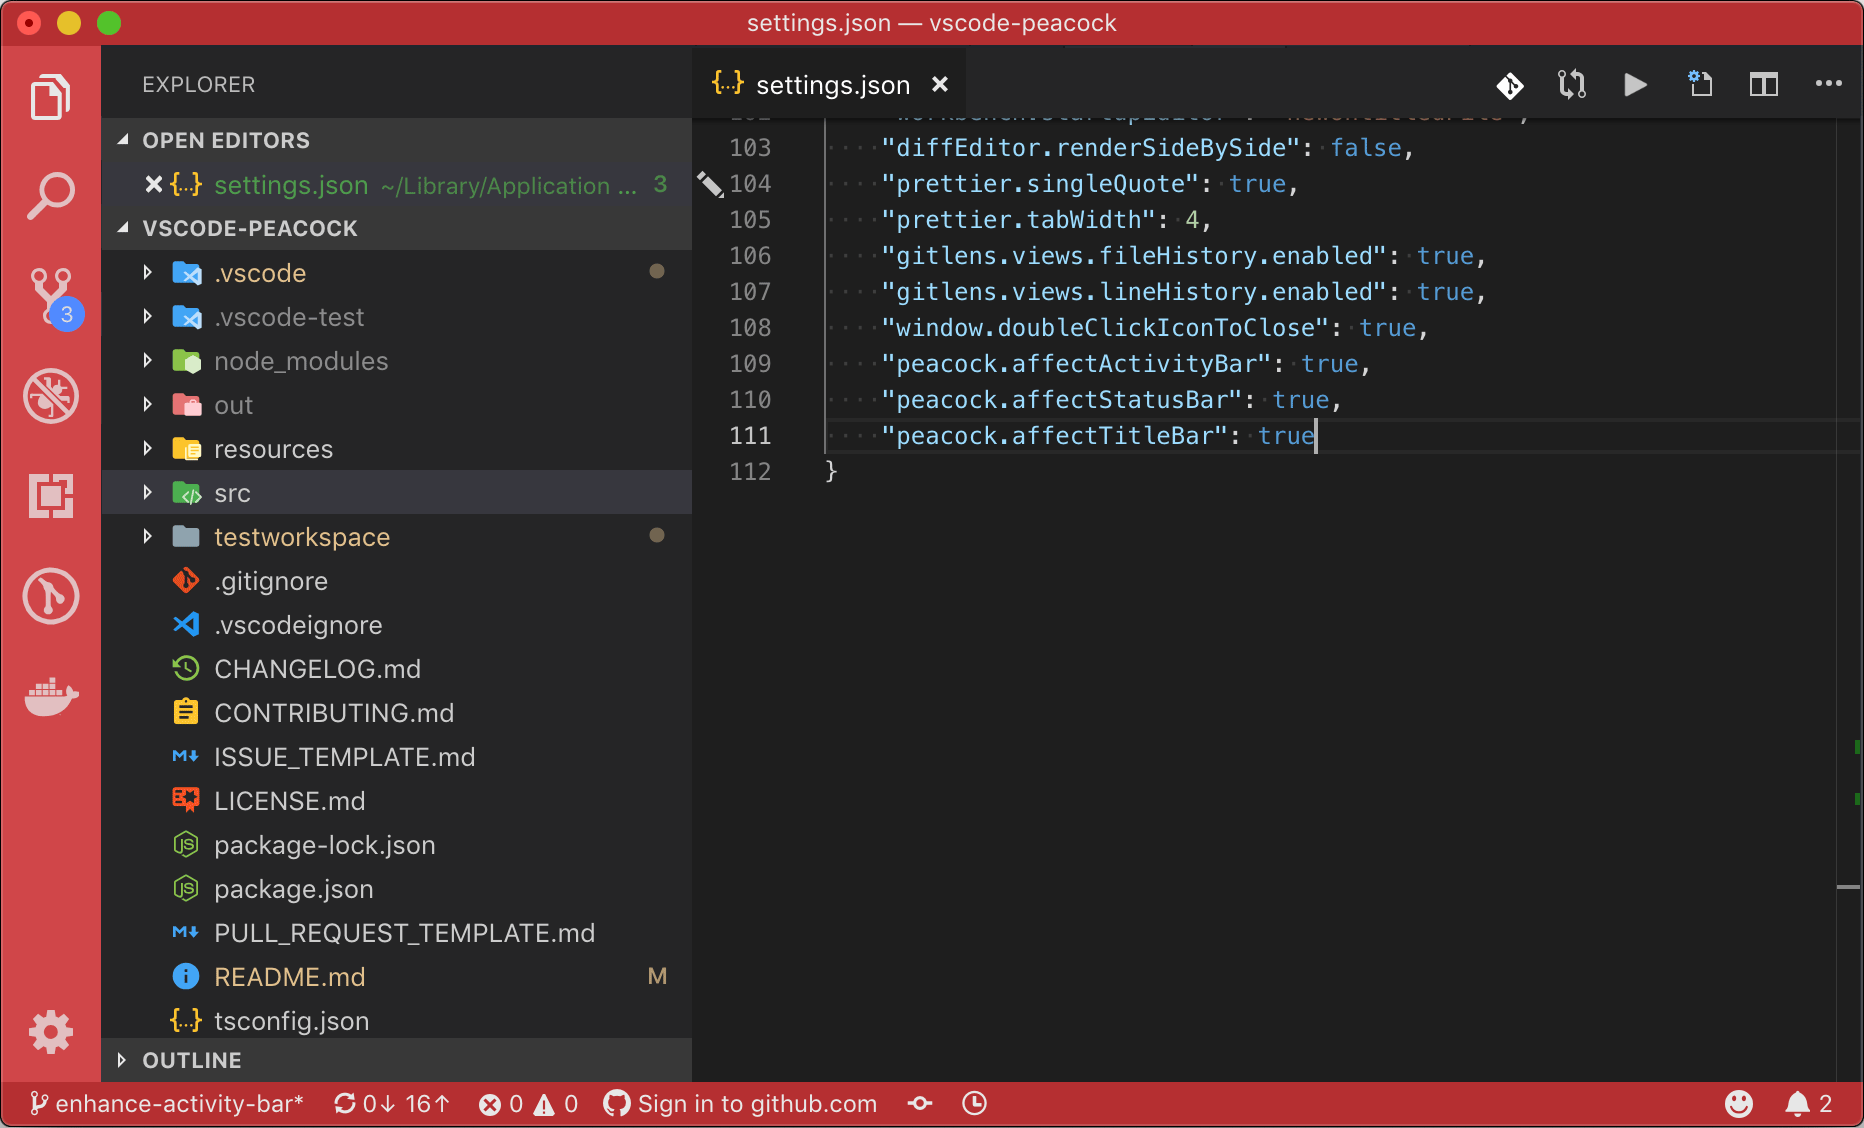
An example of using this might be to make the Activity Bar slightly lighter than the Status Bar and Title Bar to better visually distinguish it as present in several popular themes. This can be achieved with the setting in the example below.
  "peacock.affectActivityBar": true,
  "peacock.affectStatusBar": true,
  "peacock.affectTitleBar": true,
  "peacock.elementAdjustments": {
    "activityBar": "lighten"
  }
This results in the Activity Bar being slightly lighter than the Status Bar and Title Bar (see below).
Keep Foreground Color
Recommended to remain false (the default value).
When set to true Peacock will not colorize the foreground of any of the affected elements and will only alter the background. Some users may desire this if their theme's foreground is their preference over Peacock. In this case, when set to true, the foreground will not be affected.
Surprise Me On Startup
Recommended to remain false (the default value).
When set to true Peacock will automatically apply a random color when opening a workspace that does not define color customizations. This can be useful if you frequently open many instances of VS Code and you are interested in identifying them, but are not overly committed to the specific color applied.
If this setting is true and there is no peacock color set, then Peacock will choose a new color. If there is already a color set, Peacock will not choose a random color as this would prevent users from choosing a specific color for some workspaces and surprise in others.
Lighten and Darken
You may like a color but want to lighten or darken it. You can do this through the corresponding commands. When you choose one of these commands the current color will be lightened or darkened by the percentage that is in the darkenLightenPercentage setting. You may change this setting to be a value between 1 and 10 percent.
There are key bindings for the lighten command alt+cmd+= and for darken command alt+cmd+-, to make it easier to adjust the colors.
Commands
| Command | Description |
|---|---|
| Peacock: Reset Workspace Colors | Removes any of the color settings from the .vscode/settings.json file. If colors exist in the user settings, they may be applied |
| Peacock: Remove All Global and Workspace Colors | Removes all of the color settings from both the Workspace .vscode/settings.json file and the Global user settings.json file. |
| Peacock: Enter a Color | Prompts you to enter a color (see input formats) |
| Peacock: Color to Peacock Green | Sets the color to Peacock main color, #42b883 |
| Peacock: Surprise me with a Random Color | Sets the color to a random color |
| Peacock: Change to a Favorite Color | Prompts user to select from their Favorites |
| Peacock: Save Current Color to Favorites | Save Current Color to their Favorites |
| Peacock: Add Recommended Favorites | Add the recommended favorites to user settings (override same names) |
| Peacock: Darken | Darkens the current color by darkenLightenPercentage |
| Peacock: Lighten | Lightens the current color by darkenLightenPercentage |
| Peacock: Show and Copy Current Color | Shows the current color and copies it to the clipboard |
| Peacock: Show the Documentation | Opens the Peacock documentation web site in a browser |
Keyboard Shortcuts
| description | key binding | command |
|---|---|---|
| Darken the colors | alt+cmd+- | peacock.darken |
| Lighten the colors | alt+cmd+= | peacock.lighten |
| Surprise Me with a Random Color | cmd+shift+k | peacock.changeColorToRandom |
Integrations
Peacock integrates with other extensions, as described in this section.
VS Live Share Integration
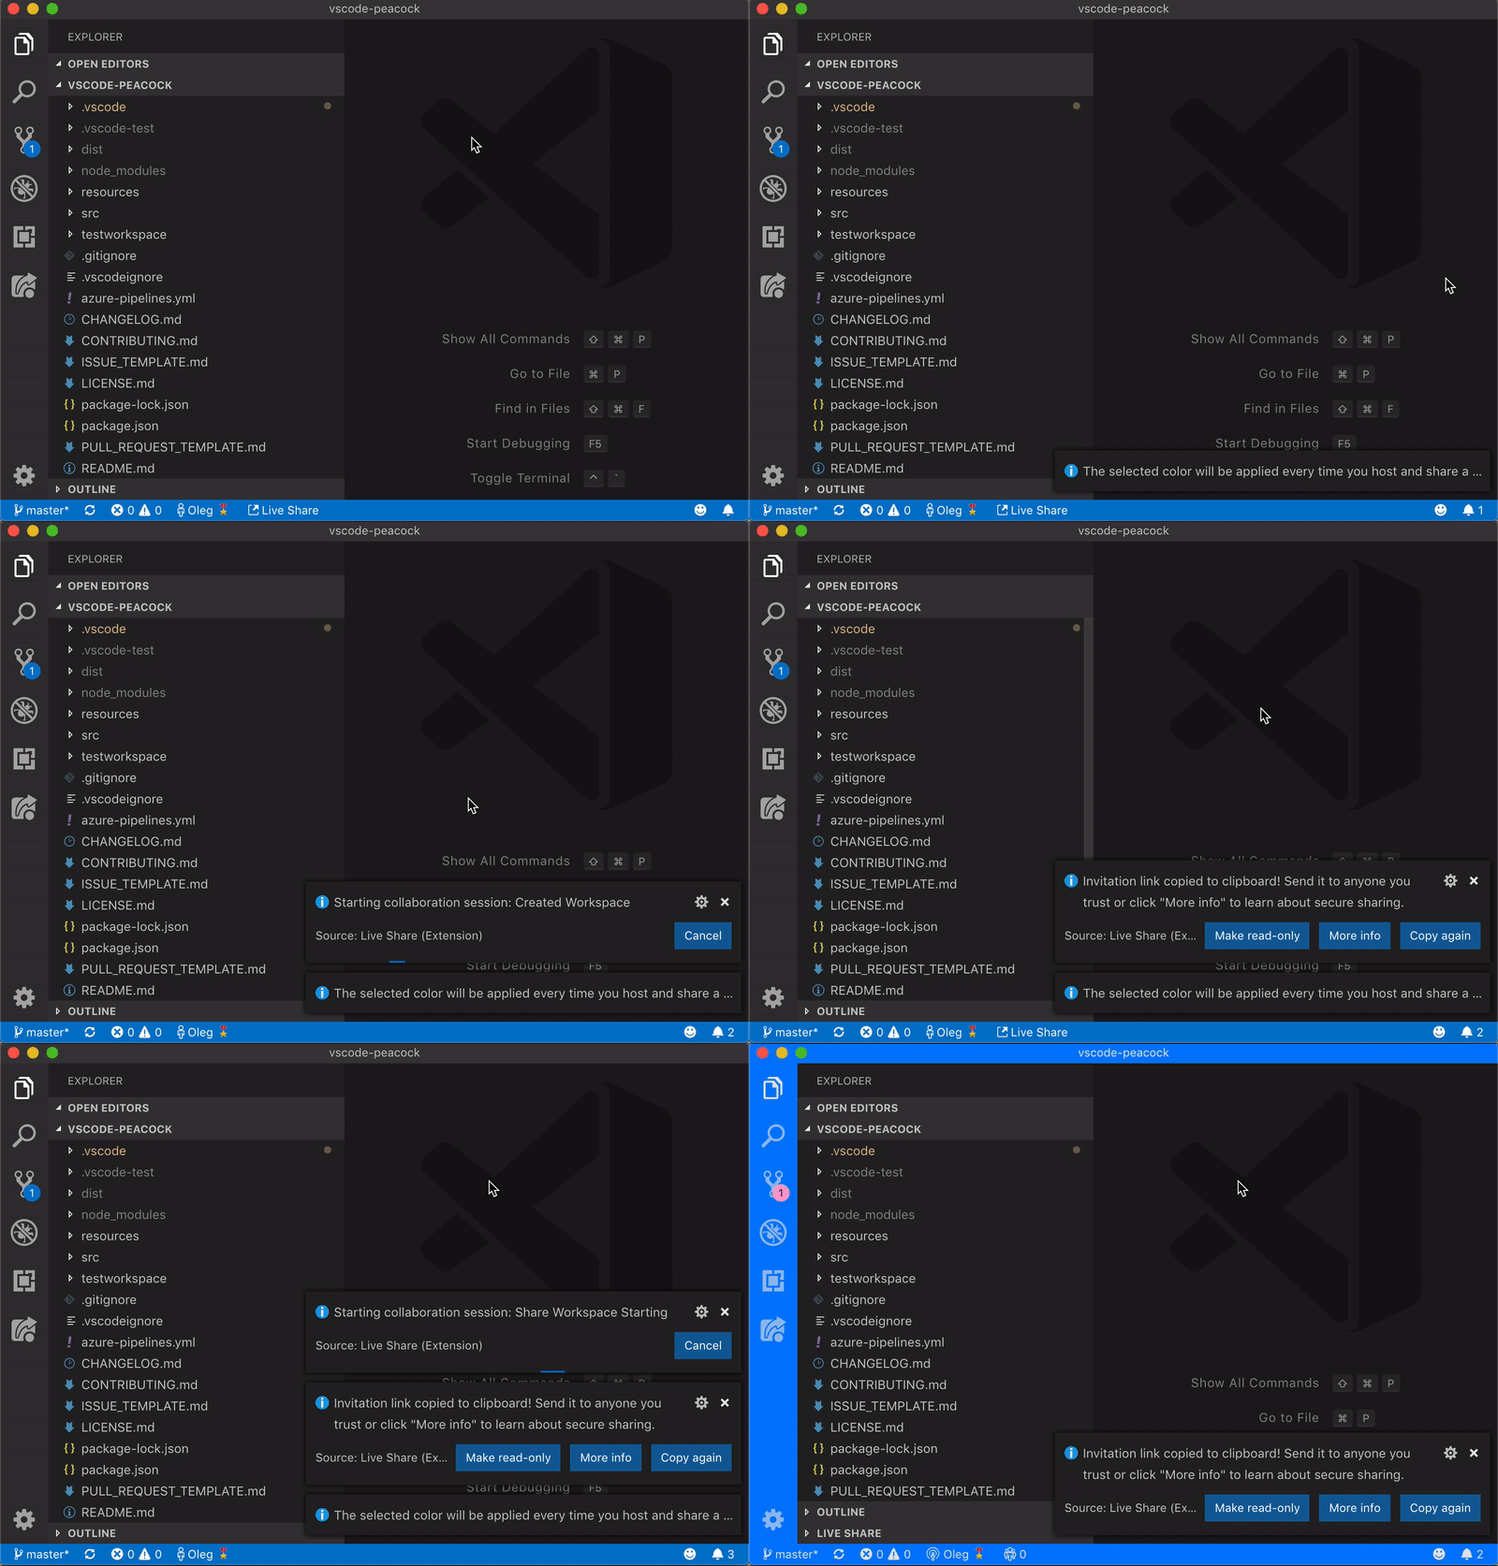
Peacock detects when the Live Share extension is installed and automatically adds two commands that allow the user to change color of their Live Share sessions as a Host or a Guest, depending on their role.
| Command | Description |
|---|---|
| Peacock: Change Live Share Color (Host) | Prompts user to select a color for Live Share Host session from the Favorites |
| Peacock: Change Live Share Color (Guest) | Prompts user to select a color for Live Share Guest session from the Favorites |
When a Live Share session is started, the selected workspace color will be applied. When the session is finished, the workspace color is reverted back to the previous one (if set).
- Learn more about Live Share
- Get the Live Share extension
- Get the Live Share extension pack, which now includes Peacock
Remote Development Integration
Peacock integrates with the Remote Development features of VS Code.
- Learn more about VS Code Remote Development
- Get the VS Code Remote Development Extensions
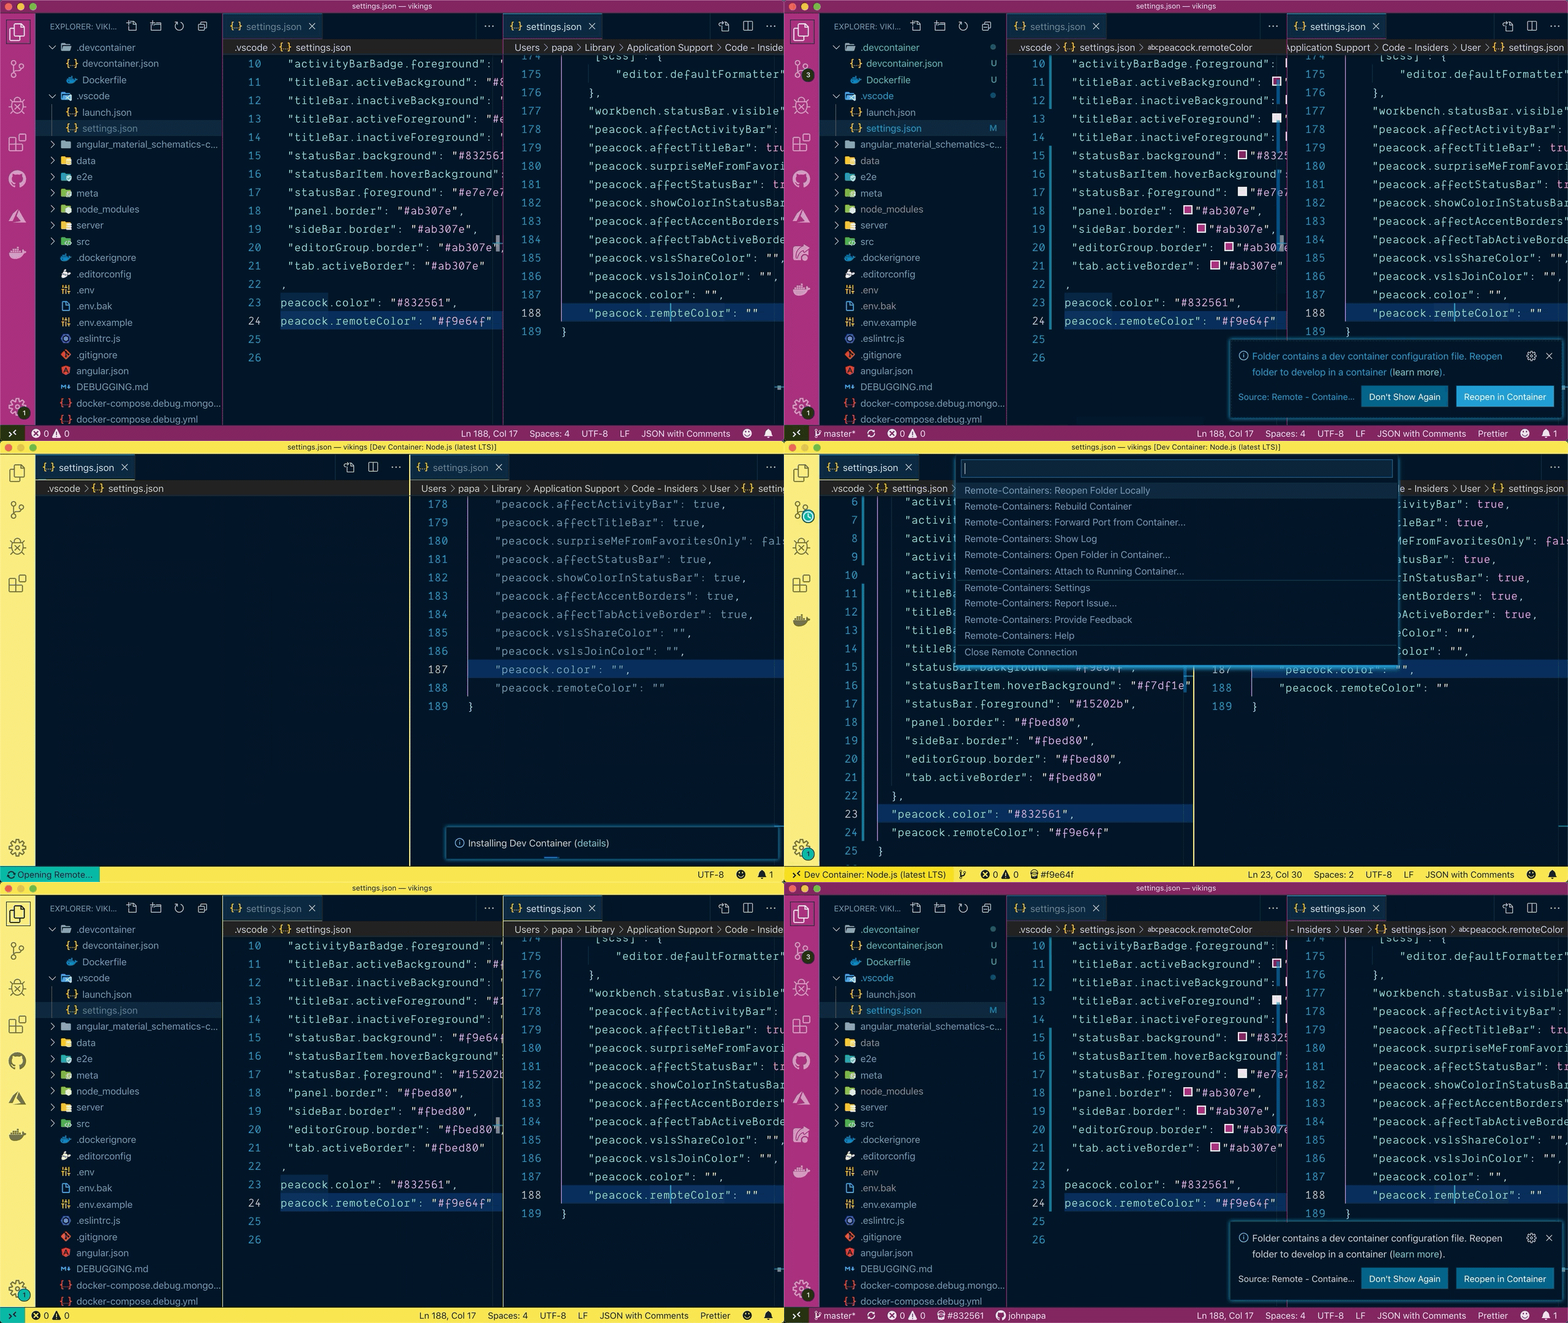
Peacock detects when the VS Code Remote extension is installed and adds commands that allow the user to change color when in a remote context. All remote contexts share the same color (wsl, ssh, containers).
When a workspace is opened in a remote context, if a peacock.remoteColor is set, it will be applied. Otherwise, the regular peacock.color is applied.
VS Code distinguishes two classes of extensions: UI Extensions and Workspace Extensions. Peacock is classified as a UI extension as it makes contributions to the VS Code user interface and is always run on the user's local machine. UI Extensions cannot directly access files in the workspace, or run scripts/tools installed in that workspace or on the machine. Example UI Extensions include: themes, snippets, language grammars, and keymaps.
In version 2.1.2 Peacock enabled integration with the Remote Development by adding "extensionKind": "ui" in the extension's package.json.
Input Formats
When entering a color in Peacock several formats are acceptable. These include
| Format | Examples |
|---|---|
| Named HTML colors | purple, blanchedalmond |
| Short Hex | #8b2, f00 |
| Short Hex8 (RGBA) | #8b2c, f00c |
| Hex | #88bb22, ff0000 |
| Hex8 (RGBA) | #88bb22cc, ff0000cc |
| RGB | rgb (136, 187, 34), rgb 255 0 0 |
| RGBA | rgba (136, 187, 34, .8), rgba 255 0 0 .8 |
| HSL | hsl (80, 69%, 43%), hsl (0 1 .5) |
| HSLA | hsla (80, 69%, 43%, 0.8), hsla (0 1 .5 .8) |
| HSV | hsv (80, 82%, 73%), hsv (0 1 1) |
| HSVA | hsva (80, 82%, 73%, 0.8), hsva (0,100%,100%,0.8) |
All formats offer flexible data validation:
- For named HTML colors, case is insensitive
- For any hex value, the
#is optional. - For any color formula value all parentheses and commas are optional and any number can be a decimal or percentage (with the exception of the alpha channel in rgba(), hsla(), and hsva() which must be a decimal between 0 and 1).
Alpha Support
Peacock allows for control of the alpha channel through a variety of input formats listed above. In general, it is recommended to avoid using transparent colors because it may result in poor readability. This is due to elements being affected by Peacock rendering over the VS Code workbench which will have either a light or a dark background based on the current theme. At the current time, extensions within VS Code do not have access to information about the current workbench color which will impact the readability calculations that Peacock performs to select various element colors based on the entered color. See #293 for more information.
Roadmap
There are many features in the roadmap.
Issues
Please refer to the issues list and feel free to grab one and contribute!
Contributions
See these pages for details on contributions and our code of conduct.
Logging
Peacock writes to VS Code's log output. You can open the output panel and select "Peacock" to see the log. This can be helpful when reporting issues.
Changes
See the CHANGELOG latest changes.
FAQ
Peacock commands are not appearing
Peacock only works if a workspace is open in Visual Studio Code because it needs the settings.json file to work. When it is not in a workspace, all commands are hidden and disabled except for the "Peacock: Open Documentation" command.
What does Peacock affect
Peacock affects:
- the titlebar, activitybar, and statusbar elements
- anything regarding the readability of these elements
- background and foreground colors
- any elements that are displayed within these peacock elements (e.g. badges, hover)
What happens when you change the user settings
When any Peacock setting is changed, Peacock should update the colors appropriately based on the most recently used color during the active VS Code instance's session.
Example 1
User selects a color, then later changes which elements are affected.
- User chooses "surprise me" and sets the color to #ff0000
- Peacock saves #ff0000 in memory as the most recently used color
- User goes to settings and unchecks the "Peacock: Affect StatusBar"
- Peacock listens to this change, clears all colors and reapplies the #ff0000
Example 2
User opens VS Code, already has colors in their workspace, and immediately changes which elements are affected.
- User opens VS Code
- Workspace colors are set to #369
- User goes to settings and unchecks the "Peacock: Affect StatusBar"
- Peacock listens to this change, clears all colors and reapplies the #369
Example 3
User opens VS Code, has no colors in workspace, and immediately changes which elements are affected.
- User opens VS Code
- No workspace colors are set
- Peacock's most recently used color is not set
- User goes to settings and unchecks the "Peacock: Affect StatusBar"
- Peacock listens to this change, however no colors are applied
How does title bar coloring work
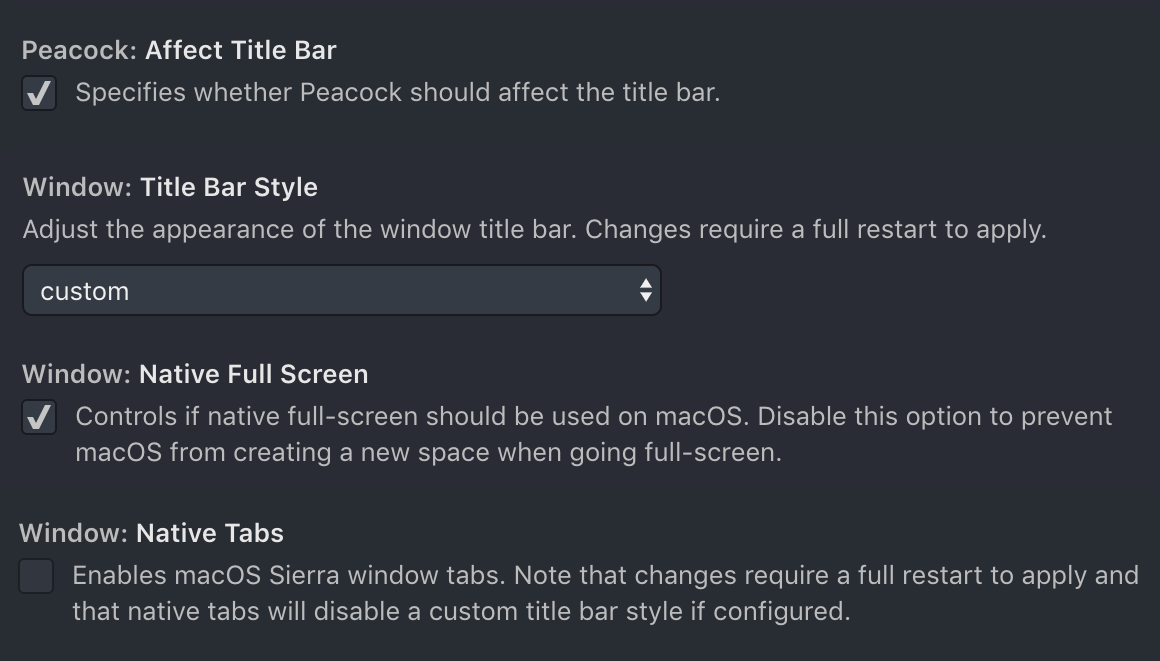
The VS Code Title Bar style can be configured to be custom or native with the window.titleBarStyle setting. When operating in native mode, Peacock is unable to colorize the Title Bar because VS Code defers Title Bar management to the OS. In order to leverage the Affect Title Bar setting to colorize the Title Bar, the window.titleBarStyle must be set to custom.
On macOS there are additional settings that can impact the Title Bar style and force it into native mode regardless of the window.titleBarStyle setting. These include:
window.nativeTabsshould be set to false. If using native tabs, the rendering of the title bar is deferred to the OS and native mode is forced.window.nativeFullScreenshould be set to true. If not using native full screen mode, the custom title bar rendering presents issues in the OS and native mode is forced.
A successful and recommended settings configuration to colorize the Title Bar is:
How are foreground colors calculated
Peacock is using tinycolor which provides some basic color theory mechanisms to determine whether or not to show a light or dark foreground color based on the perceived brightness of the background. More or less, if it thinks the background is darker than 50% then Peacock uses the light foreground. If it thinks the background is greater than 50% then Peacock uses the dark foreground.
Brightness is measured on a scale of 0-255 where a value of 127.5 is perfectly 50%.
Example:
const lightForeground = '#e7e7e7';
const darkForegound = '#15202b';
const background = '#498aff';

const perceivedBrightness = tinycolor(background).getBrightness(); // 131.903, so 51.7%
const isDark = tinycolor(background).isDark(); // false, since brightness is above 50%
const textColor = isDark ? lightForeground : darkForeground; // We end up using dark text
This particular color (#498aff) is very near 50% on the perceived brightness, but the determination is binary so the color is either light or dark based on which side of 50% it is (exactly 50% is considered as light by the library). For the particular color #498aff, all of the theory aspects that tinycolor provides show that using the dark foreground is the right approach.
const readability = tinycolor.readability(darkForeground, background); // 4.996713
const isReadable = tinycolor.isReadable(darkForeground, background); // true
The readability calculations and metrics are based on Web Content Accessibility Guidelines (Version 2.0) and, in general, a ratio close to 5 is considered good based on that information. If we run the lightForeground through the same algorithm you can see that readability actually suffers with a reduced contrast ratio:
const readability = tinycolor.readability(lightForeground, background); // 2.669008
const isReadable = tinycolor.isReadable(lightForeground, background); // false
Why is the foreground hard to see with my transparent color
The readability calculations that Peacock uses to determine an appropriate foreground color are based only on the color information of the entered background color. The alpha component is currently ignored in these calculations because of complications with VS Code that make it difficult to determine the actual background color of the affected elements. See Alpha Support for more information.
Why are my affected elements not transparent
Peacock allows you to enter colors that can be transparent, but the VS Code window itself is not transparent. If the entered color has some level of transparency, the resulting color of the affected elements will be based on the transparent color overlaying the default color of the VS Code workbench. In light themes the VS Code workbench color will be a very light gray and in dark themes a very dark gray.
What are recommended favorites
Recommended favorites are a list of constants found in favorites.ts. These are alphabetized.
Recommended favorites are a starting point for favorites. They will be installed whenever a new version is installed. They will extend your existing favorites, so feel free to continue to add to your local favorites! However be careful not to change the color of the recommended favorites as they will be overridden when a new version is installed.
This list may change from version to version depending on the Peacock authoring team.
What are mementos
Peacock takes advantage of a memento (a value stored between sessions and not in settings).
| Name | Type | Description |
|---|---|---|
| peacockMementos.favoritesVersion | Global | The version of Peacock. Helps identify when the list of favorites should be written to the user's settings |
Try the Code
If you want to try the extension out start by cloning this repo, cd into the folder, and then run npm install.
Then you can run the debugger for the launch configuration Run Extension. Set breakpoints, step through the code, and enjoy!
Badges
Resources
- Get VS Code
- Create your first VS Code extension
- VS Code Extension API
- Learn how to add WebPack bundles to your favorite extensions
- Try Azure Free


